3D printing
Designing 3D printed paint racks
Learning to design and print my own paint racks
In settling in to my new painting table and area, I’ve disappeared somewhat into the 3D printing rabbit hole. First up: paint racks.
For the past 18 months, I’ve been using a pair of balsa paint racks from a seller on Etsy. They weren’t much fun to put together and felt a little flimsy once built but have actually been perfectly good for my needs: they sat on a shelf just above my tiny old painting desk and kept all (most) of my paints within easy reach.
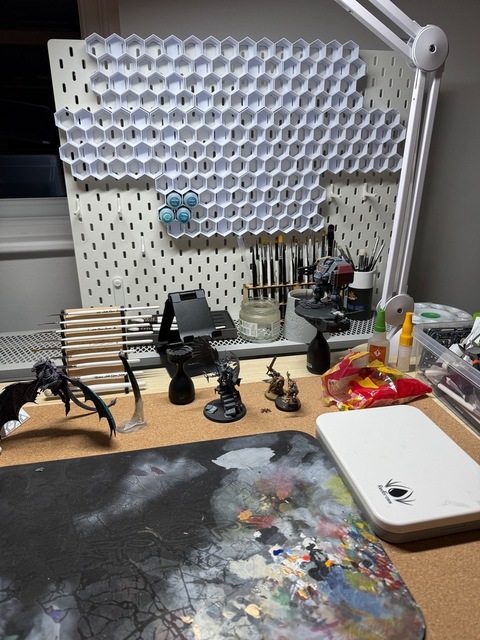
With a couple of months during building work to make plans for a new space however, I started looking into mounted paint racks for a bit more stability and focused in on using IKEA Skådis pegboards mounted to a new desk as my base.
Early attempts
I came across a bunch of people providing designs for 3D printed small racks that could hang on a pegboard or otherwise be affixed to a wall or board.
Attempt 1: hex racks
To begin with, I’d decided on trying some cool-looking hex-shaped racks that looked like they’d offer really good space efficiency.
These promised so much — not least, a misguided ambition to create a colour wheel arrangement of paints (which doesn’t actually work with the range of both hue, lightness and saturation across a collection) but didn’t deliver and was a relatively expensive mistake.
The key failing is that the paints are too close in this arrangement so that every time you pull one out, it catches its neighbours and brings them with it.
Attempt 2: “Oh yeah, my brother has a 3D printer…”
Along with the failure of these racks, I remembered my brother has a 3D printer and that I could have learned this lesson much more cheaply.
So for round 2, he kindly offered to print out a few test copies of a different style rack.
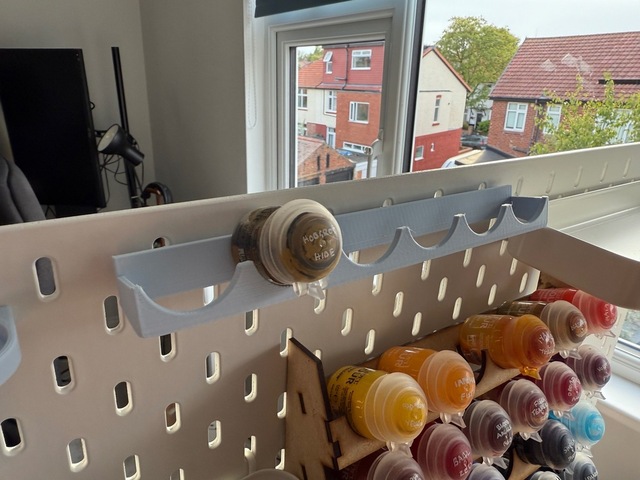
These racks had integrated pegs to mount to the Skådis backboard rather than using command strips, which was nice. They held the pots upright and Christian made a couple of rounds of prototype to create a notch at the bottom and reveal the printed paint name after I mentioned it was covered.
I was pretty happy with these until I realised that with the pots upright, space efficiency had gone out the window and I couldn’t fit my full set on the board.
Time to learn CAD
By this point, I’d bought another couple of the balsa racks as temporary measures. They may take up desk space and not be the most sturdy, but they do just work.
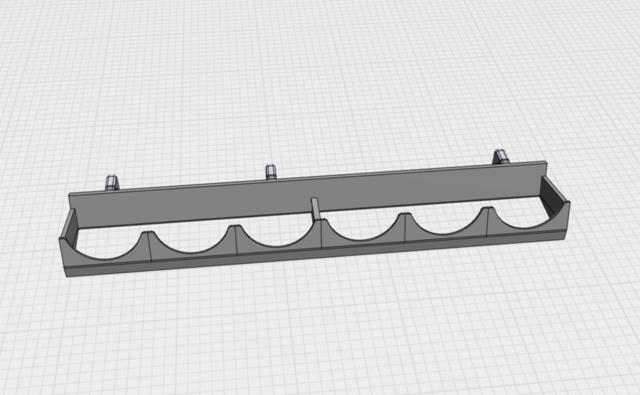
Not wanting to give up though, I decided it really couldn’t be that hard to design my own rack, inspired by the tilted angle of the wood racks that had been working well for me. Christian patiently helped me figure out the early steps of making something practical to print and I began iterating based on his feedback.
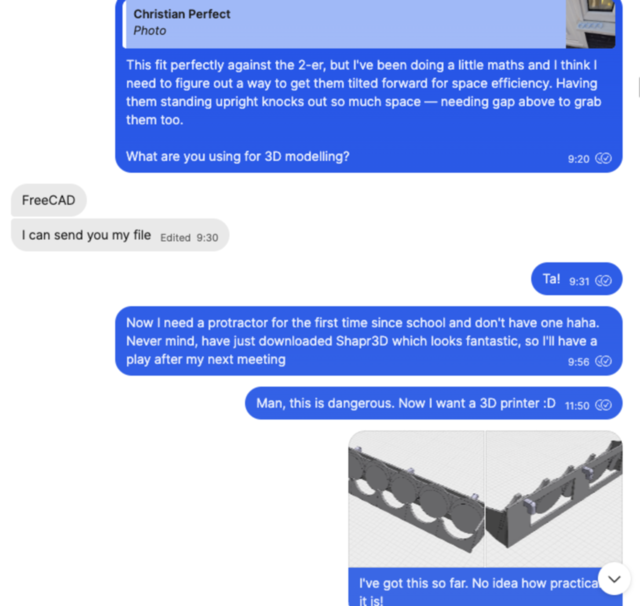
After a few rounds over a couple of weeks, we got to a simple design that worked pretty well.
And time to buy a 3D printer, right?
Making progress with the rack for standard 12ml Citadel pots and starting to get the hang of Shapr3D (fantastic software for designing 3D objects as a beginner, although very expensive to go with it), I began to look at whether I could practically fit a printer into my own office.
Identifying the one corner with a gap — and with both Elegoo and Bambu Lab running enticing sales at the time — I decided to take the plunge. After much vacillating, I decided the Bambu A1 was the one to go for. I’ll perhaps write about that separately.
Speeding up the prototyping process
With my own 3D printer now in hand, I could prototype far more rapidly as well as produce the large number of racks I needed for my paint collection.

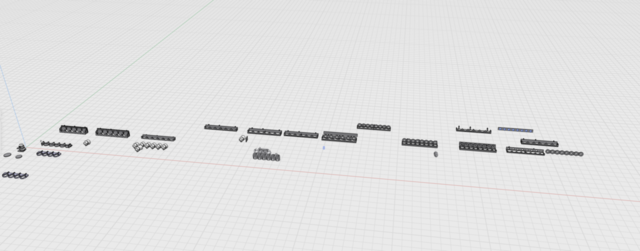
I’d got the standard rack design working well for the 12ml pots and finally, with 21 of them printed and hung on the pegboard, I could cover the full Citadel layer and base paints range:
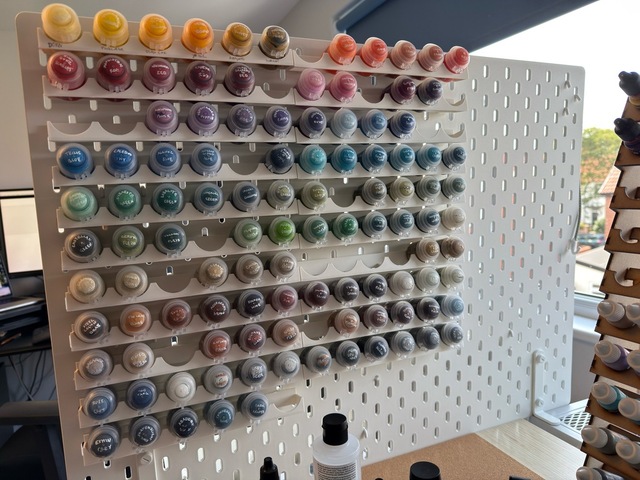
A few gaps but yes, I have indeed bought far too many Citadel paints!
Larger paints
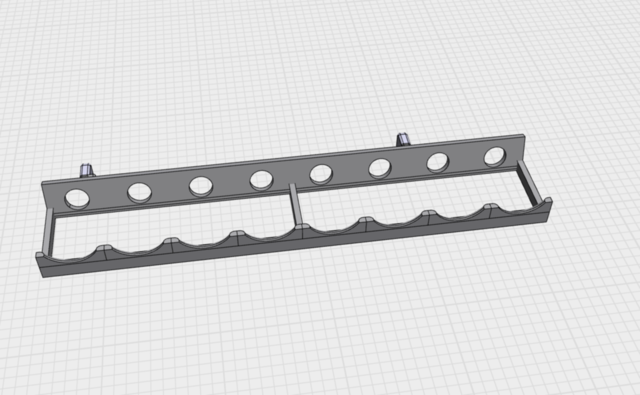
This only covered the 12ml pots. Contrast paints generally come in 18ml pots, while many of the technical paints are 24ml, so I set about extending the design for the larger size. An early test of an 18ml pot on the rack I’d already designed showed it would fall out too easily if the pegboard wobbled (which it can).
I made the rack arms longer but a bit too long at first attempt. They fit a 24ml pot well, but the gap reached the point where the pot is still quite easy to slip and fall through the bottom.
A second round fit the 18ml too, though still doesn’t quite feel as stable as I’d like so I’ll be spending a little more prototyping time to figure out whether it’s worth having some kind of catch at the bottom to stop these larger pots falling through.
What about dropper bottles?
I’ve also begun to create a similar rack for dropper bottles, which are an entirely different shape and size profile. I also have one of the balsa frames for droppers along the same basic design as the Citadel version, so started there.
I’ve quickly simplified the design to get something very minimal in profile which holds the bottles best with the cap pointing to the back, where the narrow tip can sit into a circular hole for a bit more security.
As it’s not possible to write paint name on the caps of dropper bottles anyway, having the bottom be the visible part probably works better anyway, where you can see the paint colour itself.
Next steps
It’s been really satisfying working through the design of these physical objects. My career has been based on designing software and websites for screen, so bringing those skills and applying them to something I can hold in my hand has been interesting.
I’ve got work to do improving the designs for larger Citadel pots and dropper bottles and then I’d like to work on a better rack for my paintbrushes.
More to come…